If you’re looking to use Divi 4.0 and add in a custom header for the WordPress theme – here’s a step by step video showing you how to import header layouts and customize them. Kori Ashton gives easy to follow instruction. Here’s the video on how to build out your own custom Header using the new theme builder for Divi 4.0.
https://www.elegantthemes.com/affiliates/idevaffiliate.php?id=37301&url=57170
Full Transcript
Hey y’all, welcome to another WordPress Wednesday. My name is Kori Ashton. Last week I talked to you just briefly about how to build out a custom Header inside of the new Divi 4.0. Uh, it was so exciting, it’s so simple and easy to do. And I’m gonna make it even more easy today by showing you how to use a pre-built Header Layout package. Just a couple of clicks, all for free, I’m gonna show you right now.
Liquid Web
By the way this is brought to you by Liquid Web, the most helpful humans in hosting you guys. I absolutely love this company, and if you’re looking for support with WordPress, faster Hosting and great security you’ve got to give them a shout-out. Tell them Kori Ashton sent you there way. And be sure to use their coupon codes so you can get a discount. I’m all about a good budget.
All right, let’s look at how to do this totally for free.

This is actually an older blog article that Divi released, but it still works and it works even better today, because were able to already have these kind of pre-determined layouts that you can easily import into your Header area. Tinker and play, drag and drop, build them out however you want. You can manipulate these. I’ll put the link right here in this page, in the description box below.
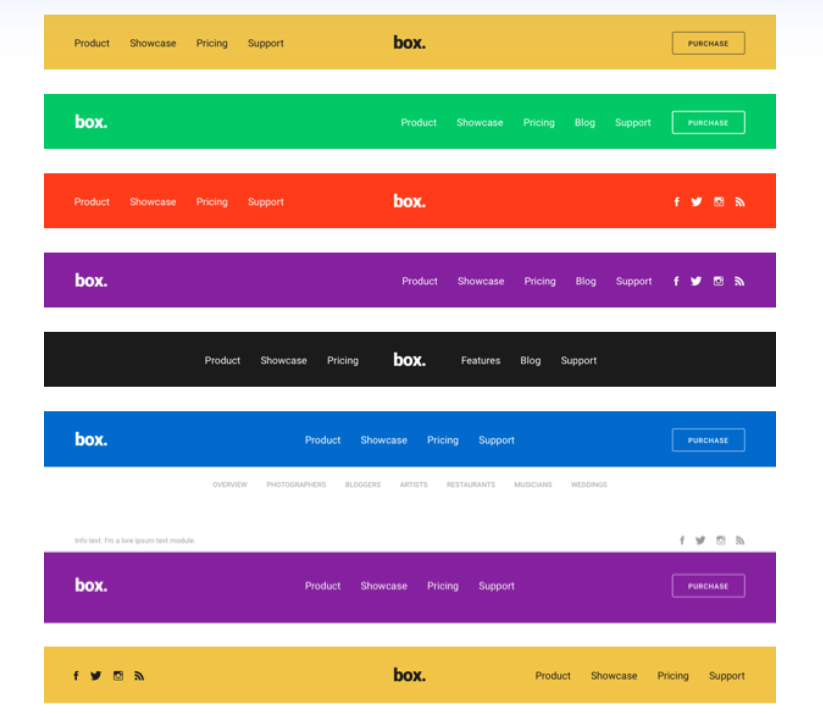
But check out these different examples. By the way, this other video is pretty phenomenal as well. These are different examples where it has a call to action button, logo in the middle, your menu items, social media feeds, all of these different Layout examples already exist inside this little zip file that you get totally for free when you come to this page. There’s a section here that’s gonna have an email address entry box.

Once you enter your email address, and click submit, this link is right here. Click on this link right here, and download the zip file. Once you do that, you’re gonna want to open it up, right, and you’re gonna have the zip file right here, and you’re gonna want to double click and open it up, because inside of that, you’ve got this nice little JSON file. And that’s what you need to go ahead and import this, into your Divi theme.
Import Header Layouts
Let’s go into your dashboard right now and do that. So we’re gonna go into Divi Library. Underneath your Divi tabs on this left side. Divi Library, up at the top, it’s Import/Export. Click on that, and click over to Import. We want to import in what we just downloaded, right. And it’s gonna go ahead and say here choose the file. Open that up, go to your downloads section. Open that up there, get into that header Divi JSON file, right. And click Import.
Super easy, just a couple of clicks, that’s all it took. I’m done. Now it lives right there, ready for us to go use. Inside of our Theme Builder, okay. Let’s leave that alone, we’re gonna click back over here now to Theme Builder.
Remember from last week, we were building out from scratch. When you click here it says add Global Header. It allows you to build from scratch or add from Library. Now, that that lives inside of our Library, we want to go access that package. So add from Library. We’re gonna go in here to your Saved Layouts, the second tab. And now that section will live in here, the Header Divi kit. Click on that, it’s gonna import it.
Customize The Global Header
Here’s the thing though y’all. That just imported every example that we had just seen. Every single example, is gonna live in our Header, available for us. What we’re gonna do now is just go in and remove the ones we don’t want. And then manipulate or change or customize the one that we do want.
Think again about the different types of content that you want to live up in that header. Do you want your logo in the middle, and your menus on the right and left side? Do you want your social media feed, or phone number that’s gonna be clickable up there. What do you want to live in that whole header section. Maybe you want the ability to add an alert at the top of your website. This does that for you as well. Now that that’s there, we can go ahead and click on the pencil icon and go into it, again don’t panic, because we’re gonna actually see every single one of those examples.
Some might look a little wonky or weird, don’t worry about that, because there’s actually one I want to use and it’s this one right here. And it has this blue bar across it, logo on the left side, the menu and this nice to call to action purchase button. So we’re just gonna go ahead and click through and delete everything else, right.
You’re gonna want to hover over the different options and just delete each one. Okay, now that’s done, this is what I have to play around with. I’ve got my Logo over here, my Menu items, and then my CTA button, right. And I just want to make some changes to that, to customize it for me. So I’ll go in here, I’m a change this from just saying the word box, they were using the actual text for that section. I can even eliminate that completely if I wanted to, and just throw in my logo there. Change that, and add in an image. Click on these little areas here, just pause me, don’t panic if I’m moving too quickly for me. Pause and rewind, it’s super simple to do.
There’s my logo, if it’s too large, of course I can shrink that down. Adjusting the size of everything, right. Doesn’t have to be the full width, it can shrink down a little bit, it’s not a big deal. The module itself, the alignment we want that in the center of everything. Just kind of play around with that, and make that kind of live and breath, the way you want it to. If we don’t want the call to action button to say purchase, we can open that up right here, and we can say contact us, right. And we can change out that link, easily right here in this section. And click the little green box, we’re good there. Okay, obviously at the top, this purple bar that you see that’s not gonna live there, once we click save and apply it to the website. What if we don’t like the blue?
What if we say, well that blue is not even the correct shade. Well, you can come here to the gear icon go into that background, change that color completely to whatever you want it to live and breathe and be, right. So let’s drag this and give it kind of a nice lighter shade up there, maybe something around that area, sure. All right, so now that that’s done, I think I actually do want to add in some Social Media over here. What would that look like? How easily could I accomplish that? With just one click here, I can go ahead and say social, do social media follow. And I’m gonna go ahead and add in also let’s do Instagram, and of course, you can change the links and add in the links right here, click okay.
And I’ll go ahead and put it YouTube as well, all of these are the different options by default that you’re able to just easily and quickly add to these sections. And then I’m going to change the alignment of them. I want them all over here on this side. And then, I’m gonna want a little bit of spacing, because that seems like it’s really snug on top there. So let’s put in like 20 pixels, kind of push that down a little bit. Actually, I might even move those to the top. So let’s take that off, and put a 20 here for now, just to see if when we drag these up above the button, how does that look. Okay, so now I’ve got my social media icons living there, maybe I want a little more padding here now that I’ve expanded that. You can just drag and kind of drop that. Play around with all the spacing in this area. That’s why it’s so exciting, it’s so easily customizable. And you can tell from just this, it doesn’t even look like the example that I imported, right. It just allowed me to quickly and easily get to those different layout options.
So I’m gonna go down here to the bottom. Click open that little drawer, click save. You’ll x out of this screen, once that checkmark comes up. Now that you’re here and you have your global header, you’ll go ahead and click save all changes. Again, remember if you only wanted this specific header, to display on specific posts or pages, you can actually do that. You would do that, just by coming into this section, creating that and saying this particular header only applies to these pages, these posts, this blog, this product, whatever that might be.
Pretty darn cool. Now that that’s saved, you come back over here to the front side of your website, you see the default that was there. Click refresh, and there is our new header. Remember though you can easily make your own custom solution as well. And there’s all sorts of options online to download Divi header packs, if that’s what you’re googling around for. Some are probably premium where you have to pay a small fee to get the zipped file. But others are gonna be totally free, able for you to upload. Just be sure to vet them, be sure that they’re legitimate developers and that they’re compatible with your version of Divi and WordPress.
All right, I hope this helped you. Every single Wednesday I’m creating content just like this to help you improve your online marketing inside the world of WordPress. Please be sure to like, subscribe, tweet to me. Come hang out with me on Instagram, on Facebook. Come be a part of our Press Tribe group for Freelancers. I’d love to see you there. I hope you’re having a great WordPress Wednesday. See y’all next time, Bye everyone. Shout out to my Seahawks. We’re doing pretty well this season.
