Learn how to create and embed a custom, free Google Map on your WordPress website with this free tutorial on WordPress Wednesday. Kori Ashton shows you step-by-step how to add multiple locations to a custom Google map and then save & embed the map easily on your WordPress website. It’s a simple (plugin free) option.
Hey, y’all, I’m Kori Ashton, and I’m gonna show you right now how to go make a custom Google Map, maybe with multiple locations on it, and how to embed it inside your WordPress website. And, it’s all gonna be in the budget of free.
Let’s go do it right now. Hey, I know a lot of people are talking about Google API map fees, and that there’s a cost now associated with the API feed for a map. But, the way I’m gonna show you right now is totally in the budget of free, I’m doing it today as of this video right now going live, this works perfectly in the budget of free.
Creating Your First Free Custom Google Map
So get over there inside of Google Maps today, create your own little custom map, and embed it in your website, it’s gonna work. I’m gonna show you every step right now. Let’s get to it. Okay, so this is the example, I’ve got a map that covers seven different locations, one is out in Oklahoma, but the majority of them are here in the great state of Texas.
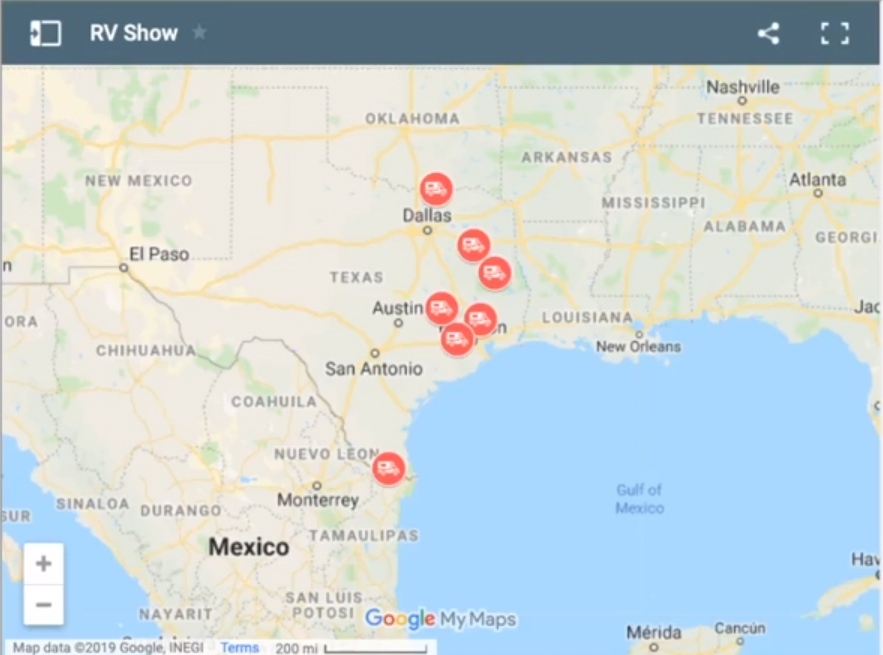
This is a Google Map, this is what the end result looks like living inside of my WordPress website. So I’m gonna show you how I selected and created each location, gave them a unique icon, a different color icon, and ultimately made this map all for free. All you have to do is go log in to your Google account. So using your Gmail, go log into your account.
Once you’ve done that, I’m gonna ask you to do a quick search inside of Google for Google custom maps, right? Just do that, and you’re gonna be able to go over here to My Maps, Google Maps, and you can click get started. This is how easy it is. You guys, super simple, no code necessary. This is the map I just showed you, but I’m gonna show you step by step how to create a new map.
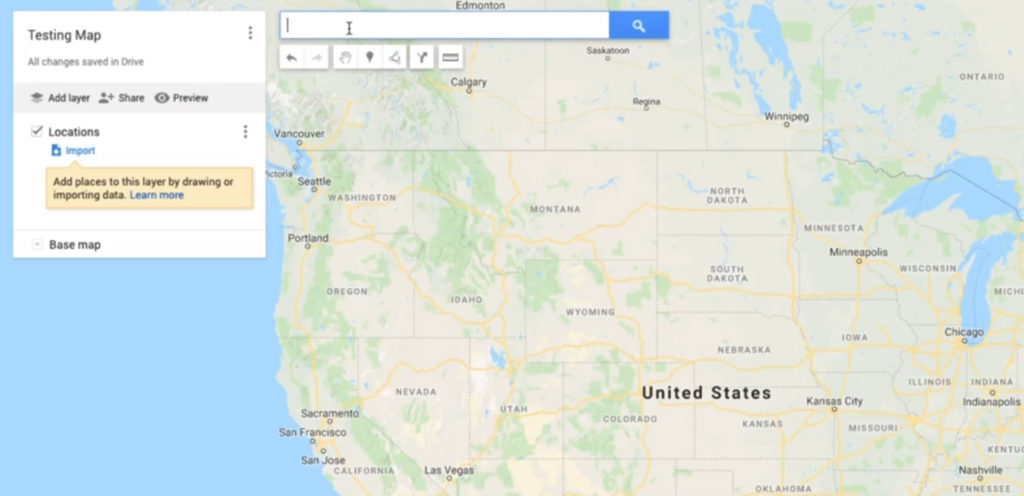
So coming here, click create a new map. You’ll give it a title, this title will appear on the actual website, so be sure you title it something that’s okay to be public, visible. And I’m just gonna do Testing Map for now, okay? And click save. You can add different layers, for the simplicity of this tutorial I’m just going to title this locations, click save.
Adding Locations to the Custom Google Map
And then we’re just gonna add a location. That’s it, just add a location. So up here in this search bar area, you can start typing in the city or the zip code, or whatever you need to add to this particular map.
I’m gonna do a couple of my favorite WordCamps all around the amazing United States, so let’s do Boston. WordCamp Boston is pretty incredible, so let’s add Boston in there.
Customizing Google Map

By default it gives you this lime green kind of icon, I’m not really a fan of that. But we can change that, so you can click add to map, we wanna add that. And right here you have some icons that come up and allow you to start changing some things, so you can edit the style if you’d like to, and change the color to kinda pop off the screen. And then they have all sorts of different icons that you can play around with. You can even click on more icons and go through all of these here and find some, do a quick search if you wanted to. I’m gonna do a little camping symbol because it’s WordCamp. So, click okay, and now I’ve got my custom icon right there.
Looks beautiful, ready to go, ready to add my next location. So let’s do Sacramento. That’s an amazing WordCamp, drop the pin right there, click add to map, and we’re going to again change our icon color, of course you can change them to any color you want. And it saves the icons that you’ve already started using in the map to make it easily accessible.
And that’s done, so now I’ve got Boston and Sacramento, and I might be a little biased, but I have to add San Antonio, Texas, which is my home town. Add to map, I’m gonna change it again, let’s do black for Spurs, why not? And there you go, and there you are. All right, so now I’ve got my three locations living here, right? I’m gonna zoom out and let you see all three pins, because what I’ve done is I’ve gone coast to coast, and one right in the middle. So we’ve got Boston on one side, Sacramento on the other. Let me zoom out, I’m still zooming.
All right, and let me kind of pivot over here a little bit so I’m not hiding Boston, there you go. Okay, so we’ve got Sacramento, Boston, and San Antonio, all across our beautiful map here. And there’s so many, if you have a favorite WordCamp be sure to comment below and give ’em a shoutout.
You know what? We’ve gotta add in Denver, you know we have to put in Denver. Add to map, give them a cool color here. I don’t like the blue, ’cause it kinda blends in with all the other things going on in the map, so I try to stay away from the blue.
Okay, all right, so those are the only four I’m gonna do for now. Zooming out kinda gives you the ability to set exactly what you want the map to look like when you go to embed it. All right, so I’m gonna zoom back out here, all the way out, so we can see again, big picture. Oh, I zoomed too far. Awesome. All right, I kinda like it. What do y’all think, not bad huh?
Embedding Your Custom Google Map
All right, so let’s go embed this. If you want to you can click preview first, clicking that little preview button again that lives right here, this little preview icon here. It’ll open up a quick preview of what it looks like. This is the legend that lives and stays with the map when you go to embed it. I’ll show you where that lives here on the example that I sent, if I open this little drawer up there’s the different locations, so that’s kind of a cool little feature that it comes with. So that stays with it, that’s one of the reasons also why adding different icon colors kinda makes them pop off, I think it looks pretty great.
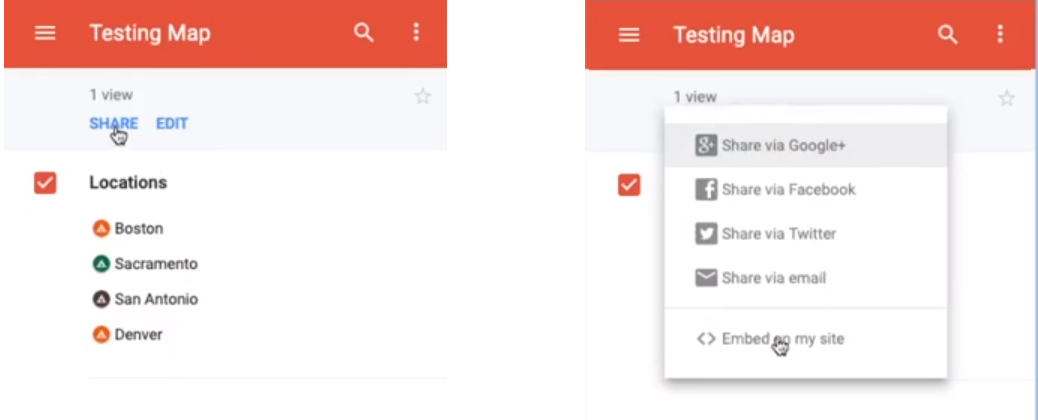
So, we need to basically just go ahead and share this. So you have to be certain that the permissions are set to public. So when we click share we wanna do the option embed on my site. Now this is where it’s gonna say this map is not public. By default my permissions are set to private, you’re not allowed to see the things that I create unless I opt for that. So I’m gonna go ahead and change the permissions on this map. And I’m gonna say that we can change this to anyone on the web can see this, and all they can do is view it though. We don’t want them to be able to edit, or change, or add to, so we just wanna click save. Now the permissions are saved, excellent, and now we can share and embed on my site.
And now I’ve got the awesome iframe code that you copy, just copy on your clipboard right now. Don’t panic that you’re viewing code, all we’re gonna do is grab the iframe code, copy it on your clipboard, and go over to your WordPress website. You can go to an existing page if you want to, but for now I’m just going to do a new page for testing the map.
And you want to stay in the text mode, not the visual mode, because you’re embedding code right now. So stay in the text mode, and just paste in that iframe code right there. Click preview, and you’ll see the beautiful embedded map right there. Testing the map, open up the little drawer, there’s our locations of our different WordCamps.
Adding Your Own Pictures and Descriptions On Your Custom Google Map
Beautifully done and ready to be clicked on. If anybody clicks on these, it shows the exact location. You can customize and put in the WordCamp logo right there, you can add your own picture, you can add a little bit more of a description if you’d like to. You can even narrow it down to actual addresses if you wanted to, there’s all sorts of different things that you can do in these different locations. But it’s a really cool option, and again, all in the budget of free.
I’ve even done a map so completely intricate that we drilled down into one of the historical districts of San Antonio, the King William Cultural Art District, and we made almost like this tour that you can go through.
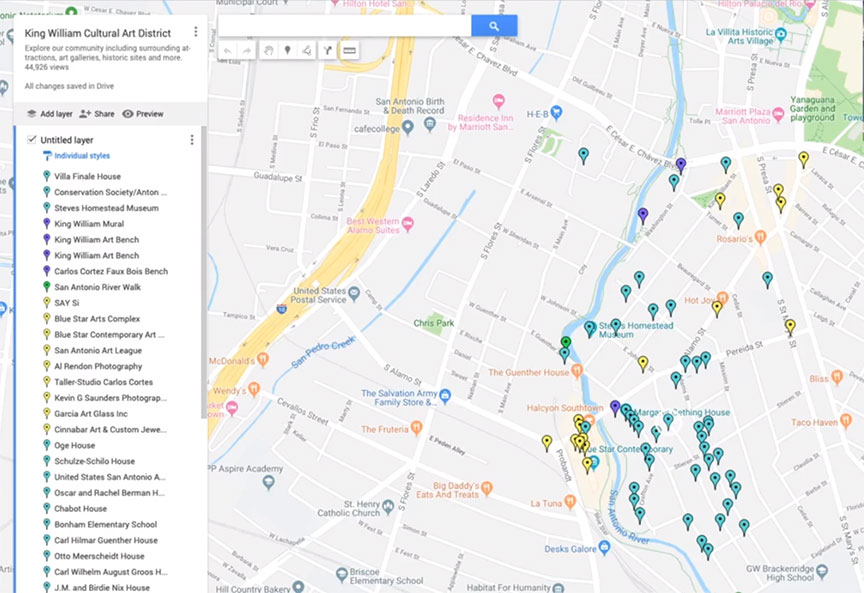
Look at all of these different things on our legend here, all of these different locations. And the cool thing about it is, you click on one of the icons, it opens up, and we did all the details about each location. A little bit of a description, and images. You could even do multiple images if you wanted to, just get creative on what all you wanted to share. So all sorts of different ways that you can add cool content. Kinda cool right?
I hope this has helped you, I love WordPress, that’s all I use, every day. If you love it, and if you’re trying to grow your online marketing using WordPress, be sure to subscribe to my channel.
I have nearly 400 videos here, all for free, that are gonna help you improve your online marketing, better your WordPress website, gain more visitors to your site with search engine optimization options, social media marketing options, all in here, mixed in here just for you. If you liked this, click subscribe, comment below, give me a tweet, I’d love to hear from you, and if you have any questions, ask Kori. I’ll see you later, bye y’all.
