When you need a popup inside of the Divi Theme it can be a little tricky to make the content inside the popup look great. With the Divi Overlay plugin you can use the Divi builder to make ANYTHING you want in the popup. Put a form in it, a login area, contact info, a map, an email capture, truly anything you want. Kori Ashton from https://askkori.com shows you step-by-step how to use the Divi Overlay WordPress plugin.
(If you’d like to purchase the Divi Builder or Divi Theme, please consider using my affiliate link. https://www.elegantthemes.com/affiliates/idevaffiliate.php?id=37301 Thanks!)
Here’s the link to the Divi Overlay Plugin
https://divilife.com/ref/342/?campaign=YouTube
Full Transcript
Hey y’all, my name is Kori Ashton, and this is another WordPress Wednesday. Today, we are looking at a really cool solution for the Divi theme. If you follow my channel, you know that I love the Divi theme. So I use it on Ask Kori, I use it for client’s websites, I absolutely love it.
Today, I ran into a little bit of an issue where I needed a popup solution. I wanted to have a text-trigger, an open modal, or a popup to happen, right? Where I wanted a form or a calendar invite to sit inside of that solution.
So, I did some digging around. I found this solution. I’m gonna show you how to use this, how to plug it in. It is a premium solution, but I think it’s completely worth your while. Let me show you, ’cause it takes just a couple of minutes.
Brought To You By Liquid Web
Hey, you guys. This is brought to you by Liquid Web, the most helpful humans in hosting. If you are running a WordPress website, which I assume you are because you’re using Divi, you probably wanna check them out for the besting hosting around, great security, fast loading websites, and I’ll put a coupon code in the description box below, so you can save some dollars.
Divi Overlays Premium License
All right, lets get to the tutorial. Specifically, the plugin I’m talking about is from divilife.com. It is called Divi Overlays. It is a premium license, so that means you have to pay for it. And you can buy it annually, I went ahead and did it for unlimited. Actually, I went ahead and did for lifetime, because I know I’m gonna use this on a lot of websites that I’m building out, and I know that I’m gonna be using it as long as I run Divi, right? So, I went ahead and invested in the lifetime license.
They also have an all-access license you might wanna take a look at. It’s pretty incredible, you get a lot more other child themes and different plugins that they’ve got available that they’ve built specifically to connect with the Divi theme. I’ll put a link to this in the description box below, if you wanna use that link. I’d appreciate it. It is an affiliate link, but that’s not the reason why I’m bragging on.
Install The Divi Overlays Plugin
‘Cause seriously, guys, I mean this thing’s pretty amazing. Once you’ve logged in, you just navigate back over to the plugin that you wanna be using, go into that page specifically. And instead of a purchase price now, it’s gonna have a download button option for you. Here it is right here.
Now, you can just go ahead and download it. And that’ll save a ZIP file onto your hard drive. Now that you have that on your hard drive, you can jump into your WordPress dashboard and lets go to the Plugins area.
You’ll click Add New. Go to Upload Plugins since this is a premium plugin, it doesn’t live in the regular repo area that you normally go to. You’re gonna go ahead and go here, and Choose File, and get it from your downloads, right? Of course, you want to install that zipped file. It only will accept a zipped format. Once it’s installed, you’re gonna wanna go ahead and click Activate.
Now that that’s active, you’ll see it here, it says Divi Overlays. And on the left side over here, we will now have a custom post app called Divi Overlays.
The first thing that it’s gonna ask you though, is to go ahead and activate your API key, so that you show that you have proof of purchase, right? So in order to get that, you just jump back over to your account.
You’re gonna run into your account area. Once you’re on your account area, you’ll see this area here that says License Keys. We wanna click View Licenses, right? This is in case you’ve purchased different products separately. I did an all-access pass, and you see this little area here, this column that says Key with a little key, you’ll click on that and this will open up and reveal to you your license key. That’s what you wanna copy and paste back over in your dashboard. For now, for security purposes, I’m gonna do this off-camera.
Once you have that on your clipboard, you’re gonna come back over to your dashboard. Here it says, click here to activate that license. If you want to, you can over to Divi Overlays and go to Settings, it takes you to the same screen.
This is right where you’ll be typing in your license key. Again, for security purposes, I’m gonna go ahead and just do this off-screen. You’ll click Save Changes, and then it says License Status, right? We wanna Activate License. Now, it’ll give you the date, it’ll tell you when that license expires, and we wanna click Save Changes.
Enabling Divi Overlays In Divi
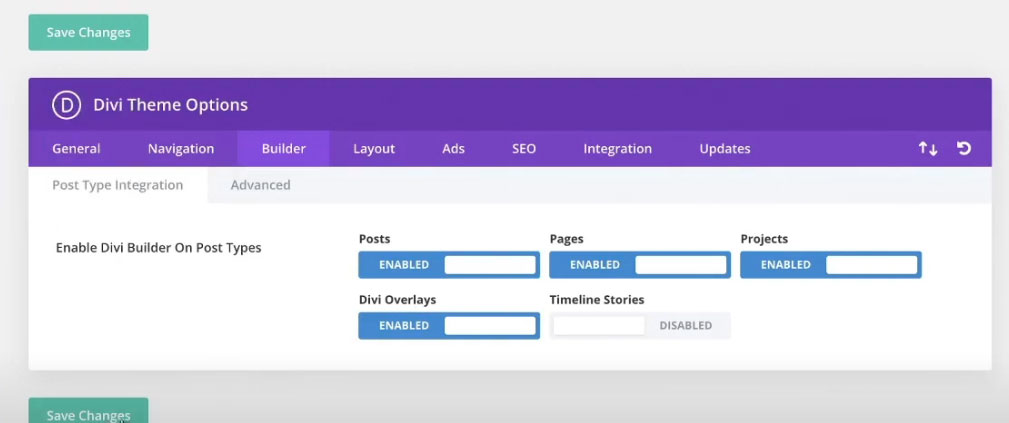
Now, before we get going any further, I wanna show you one little extra tip that I figured out, kinda the hard way. If you go into Divi and go to Theme Options, I want us to go ahead and allow the builder to work on Divi Overlays. So, follow me again. I went to Divi Theme Options, and in here, you can go over here to Builder. And you wanna be certain that it is enabled for Divi Overlays. We want that Divi builder to be able to work inside this overlays area, so we can do anything we want inside of those popups. So once you’ve enabled that, you can click Save Changes.
Create The First Overlay
Now, we can go create our first Divi Overlay. Click Add New. You can name it anything you’d like. We’re gonna name it Testing Popup, for now. And I wanna go ahead and use the Divi builder inside of here. I’m gonna go and build from scratch for now. You can do really anything you want, because we know how to use the Divi builder, right? So, super easy to do.
I’m going to do a countdown timer. Lets do it for April 17. And that is the start of WordCamp Atlanta, where I will be going and speaking. How cool is that? Click Okay. And then, I wanna put a button in there for Buy Tickets. All right, and we’re gonna put a link in there over to WordCamp Atlanta. Grab that URL and copy it onto my clipboard. Jump back in here and paste it in. We’re gonna go ahead and say Open in a New Tab, and click Okay. All right, simply done, that’s what I want.
I’m gonna scroll down a little bit further, down past Yoast, I’m gonna zip some of this up. What I wanna do is go ahead and set the overlay for the background color. And I just wanna do kind of a darker shade here, and if you want to manipulate the opacity, you can do that as well. Play around with the opacity there.
And then if you wanna change your font color, you can do that as well. There are all sorts of additional settings here on this right side, just so you know. There’s some animation settings that you can play around with for how the overlay animates as it opens. I’m just gonna keep it with the standard Fade & Slide option here. Scrolling down you have some additional options for locations. You can set it to have different categories that it’s triggering on. Only display on select pages. Display with automatic triggers. There’s all sorts of different things that you can do here in this premium plug-in. There’s really a lot of bang for your buck. It’s pretty spectacular.
Implementing the Overlay
But in order to move quickly through this tutorial, and I just want to show you kind of how to quickly get it done, I want you to come up here and highlight, and copy to your clipboard, the CSS ID. This is a unique ID that we need inside of our website, so that it opens up this really cool modal. Here’s what we’re gonna do.
Lets go ahead and click Publish, and then I want us to go ahead and go over to our page where we want to have this little bit of text that’s gonna open up this really cool little popup. And for now, what I’d like to do, is go to the front site of our website and just kind of paste it in here, just as a test.
You see regular text here and how it kind of links over, I wanna show you how this can open up that modal. So, here we go. We’re gonna enable the visual builder, come in here, our text, and we’re just going to throw in some extra text here. Buy tickets to WordCamp Atlanta 2020. See Kori speak. Right, there you go. So, what I’d like to do is highlight all of this and be sure that that’s gonna be my popup. So, here’s what we’re gonna do. I’m actually gonna click out and go into this in kind of the editing mode here, so that I can write some quick code around that.
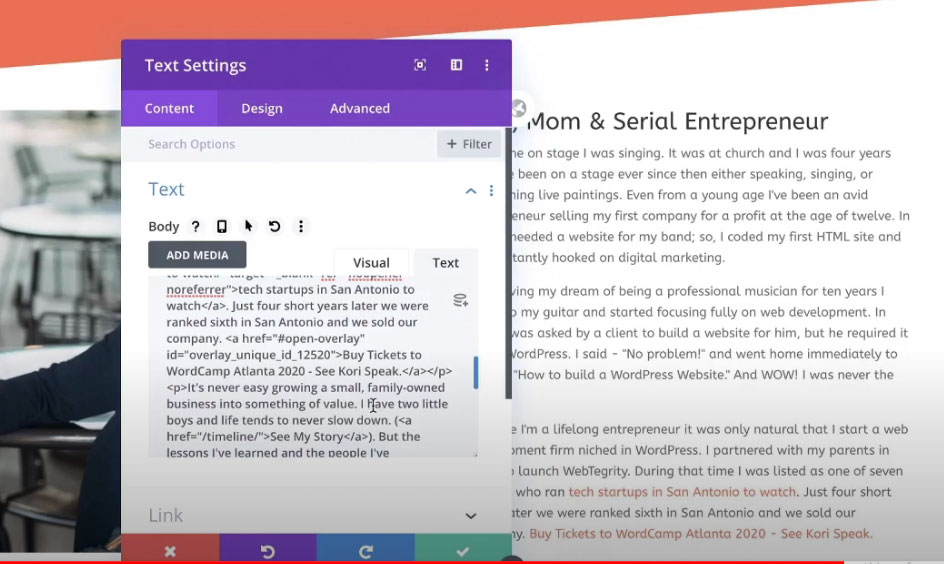
Lets see, here’s our language right here. And I’m just gonna go ahead and put just a simple, right, here’s our link. That’s all we’re doing, a simple link. Here we go. I’m gonna go in here, and I’m gonna put a pound sign and I’m gonna say open-overlay. Don’t worry if you can’t see my screen very well, I’ll put all this in the description box below. It’ll be super simple for you to handle.
We’re gonna say ID equals open, close. And we’re gonna paste in that unique identifier that we have on our clipboard. And if you forgot, don’t worry about it. All you have to do is come over to your Divi Overlays, and this is that unique identifier right there, overlay unique ID. That’s what we wanna come and bring back here. We’re gonna paste it in, and then put a follow-up quote mark, and there you go. That is literally all you have to do. Check the box. Lets test it. Click Save.
It looks just like regular text. We’re gonna go up here to the top, and we’re gonna exit the visual builder. And now that that’s disabled, you’re basically viewing it like anybody else would. Lets click and watch the modal pop up. There we go. Here’s the background, and Buy Tickets right there. You could really do anything you want inside that modal, right? You could put a form if you wanted to, you could put a calendar sign-up area if you wanted to.
You could fill up the whole screen with anything you want. You could put a whole different URL inside of there. You can literally do anything you want to do inside of this cool modal popup. You can use a button to engage that pop-up. You can use a menu item to engage that popup. Anything you can think of, there’s a way to do it.
And what’s really cool, is this plug-in actually has pretty phenomenal documentation. All of you who are on the Divi theme, be sure to check out my entire playlist that I have here for all sorts of different things that you can be doing inside the Divi theme and be sure to give me a tweet or send me an email, let me know how you’re using the Divi theme out there in the world. I’d love to check out your website.
All right, be sure to like this video, click subscribe, and I’ll see you next WordPress Wednesday. Bye, everyone!
OUTTAKE – Just want you guys to check out my really cool, new t-shirt I bought. ‘Cause whenever you’re in San Antonio, this is the way it works y’all. See you all next time. Bye, everyone.
